
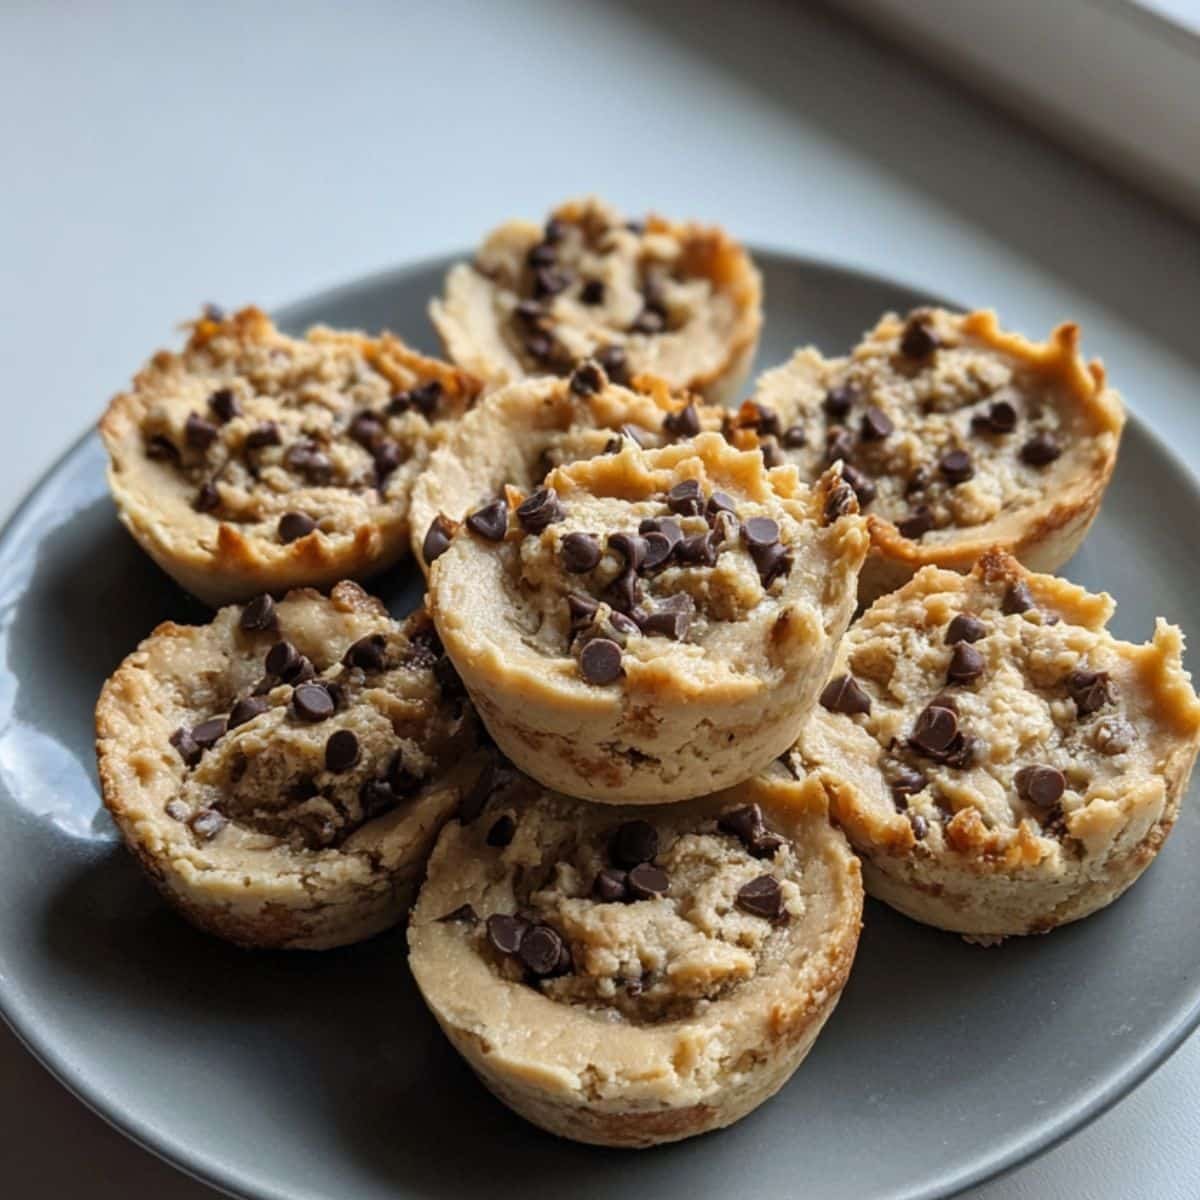
Have you ever craved that perfect bite of cookie dough but wanted something a little more special? Cookie dough cups are the answer to your dessert dreams! These adorable little treats combine the irresistible taste of edible cookie dough with the convenience of perfectly portioned cups that are impossible to resist. Whether you're hosting a party, preparing a sweet snack for the family, or simply satisfying your own sweet tooth, cookie dough cups deliver pure happiness in every bite.
What makes cookie dough cups so incredible is their versatility and simplicity. You can customize them with your favorite mix-ins, from chocolate chips to peanut butter, create no-bake versions for hot summer days, or bake them into golden perfection. These cookie dough cups are crowd-pleasers that work for any occasion, and the best part is that they're incredibly easy to make, even if you're a beginner in the kitchen.
Why Cookie Dough Cups Are Taking Over Dessert Tables
Cookie dough cups have become a sensation because they solve a classic dessert dilemma; how do you enjoy cookie dough safely while creating something impressive? These little wonders combine nostalgia with innovation, giving you that beloved raw dough flavor in a safe, delicious format. The beauty of cookie dough cups lies in their adaptability—you can make them edible without eggs, load them with chocolate chips, swirl in peanut butter, or even create healthy versions with protein powder and natural sweeteners.
What truly sets cookie dough cups apart from other desserts is their perfect portion control and presentation appeal. Unlike traditional cookies that can spread unevenly or cookie dough that needs to be scooped, these cups bake or set into beautiful individual servings that look bakery-quality. The cookie dough cups trend has exploded on social media because they're photogenic, delicious, and endlessly customizable. From Nutella-stuffed centers to ice cream fillings, from vegan alternatives to gluten-free options, there's a version of cookie dough cups for everyone's dietary needs and taste preferences.
Jump to:
Ingredients
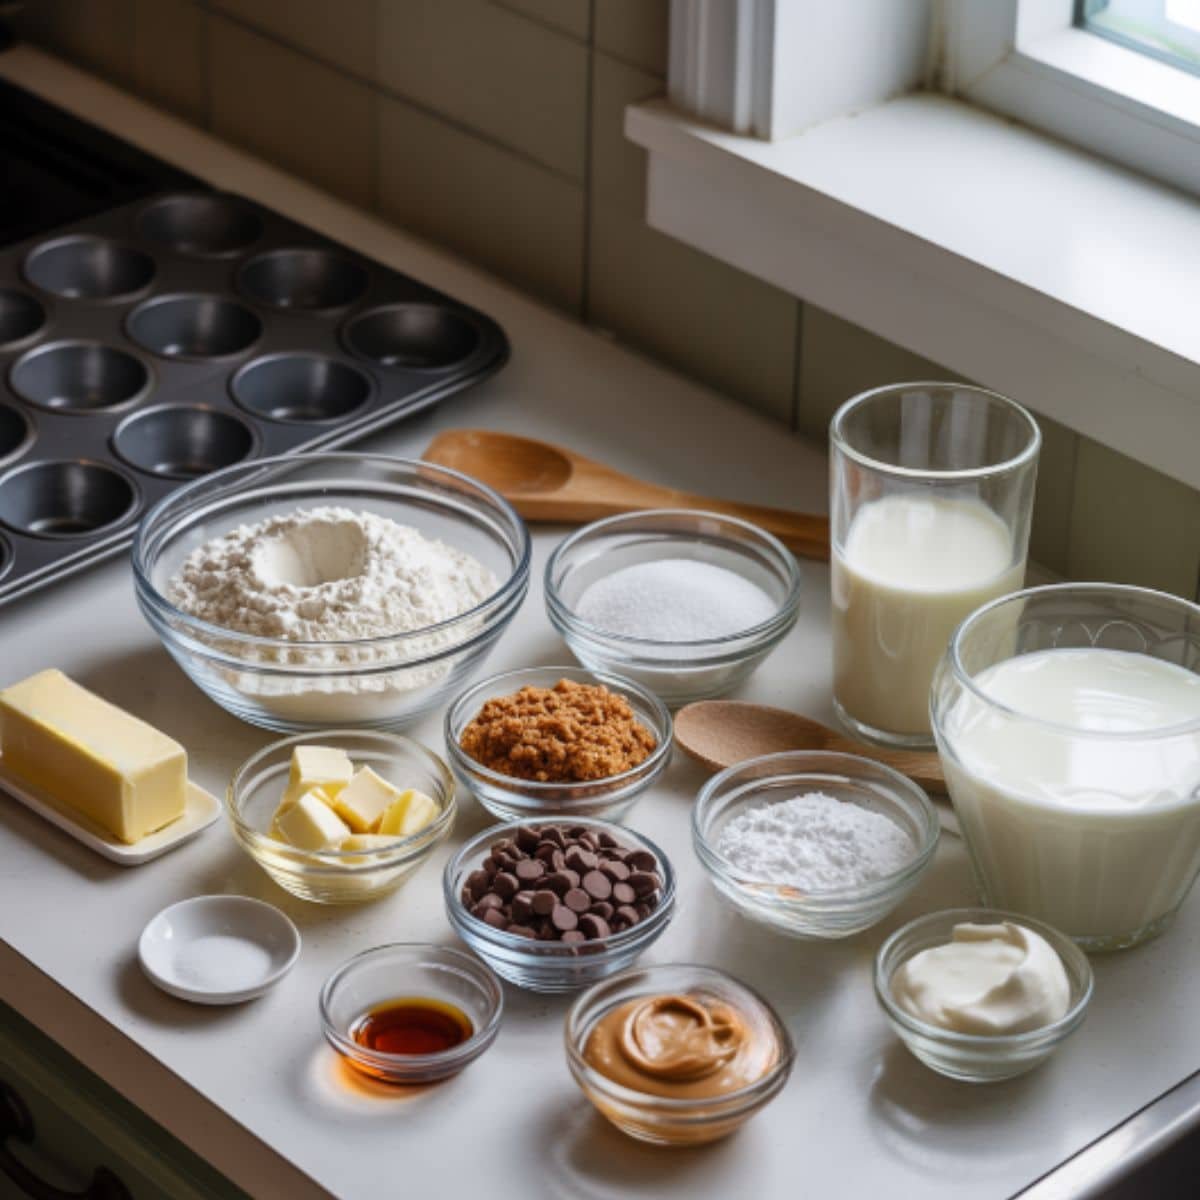
- All-purpose flour
- Brown sugar
- Granulated sugar
- Butter
- Vanilla extract
- Salt
- Chocolate chips
- Heavy cream
- Cream cheese
- Peanut butter
- Mini muffin tin
- Cooking spray
- Powdered sugar
- Milk
See recipe card for quantities.
Instructions
Prepare the Cookie Dough Base
- Cream softened butter with brown sugar and granulated sugar until light and fluffy in a large mixing bowl
- Mix in vanilla extract and a pinch of salt until well combined
- Gradually add heat-treated flour to the mixture, stirring until you achieve a thick, scoopable dough consistency
- Fold in your choice of chocolate chips, peanut butter chips, or other mix-ins until evenly distributed throughout the dough
Shape and Fill the Cups
- Spray a mini muffin tin generously with cooking spray or line with paper cups for easy removal
- Scoop rounded tablespoons of cookie dough into each cup, pressing gently to create an even layer
- If making stuffed versions, create a small indent in the center and add your filling such as Nutella, peanut butter, or cream cheese mixture
- Cover the filling with a small amount of additional cookie dough if desired, or leave as an open cup
Chill or Bake to Perfection
- For no-bake cookie dough cups, refrigerate for at least two hours until firm and set, then remove from the tin
- For baked versions, preheat your oven to 350 degrees and bake for 10 to 12 minutes until edges are golden but centers remain soft
- Allow the baked cookie dough cups to cool completely in the tin before removing to prevent breaking
- Top with additional chocolate chips, drizzle with melted chocolate, or add a dollop of whipped cream before serving
Equipment For Cookie Dough Cups
- Mini muffin tin or silicone mold
- Electric mixer or hand mixer
- Large mixing bowls
- Measuring cups and spoons
- Rubber spatula
- Cookie scoop or tablespoon
- Cooling rack
- Parchment paper or cupcake liners
- Microwave-safe bowl for melting chocolate
- Offset spatula for smoothing
Expert Cooking Tips
- Always heat-treat your flour by spreading it on a baking sheet and baking at 300 degrees for five minutes to eliminate any bacteria and make it safe to eat raw in cookie dough cups
- Use room temperature butter for the best creaming texture, which creates lighter and fluffier dough that's easier to work with
- Press the cookie dough firmly into the muffin tin cups to prevent air pockets and ensure they hold their shape when removed
- If your dough feels too crumbly, add a tablespoon of milk or cream at a time until it reaches the right consistency
- Refrigerate the dough for 15 minutes before shaping if it becomes too soft to handle during preparation
- Line your muffin tin with paper liners for easier removal and minimal cleanup, especially helpful for no-bake versions
- Don't overbake if making baked versions; slightly underdone centers will give you that perfect chewy cookie dough texture
- Customize the sweetness level by adjusting the sugar ratio to match your personal preference
Recipe Variations
- Chocolate Peanut Butter Cookie Dough Cups: Swirl creamy peanut butter into the base dough and top with mini peanut butter cups for an irresistible combination
- Vegan Cookie Dough Cups: Replace butter with coconut oil or vegan butter, use dairy-free chocolate chips, and substitute milk with almond or oat milk
- Protein Cookie Dough Cups: Add two scoops of vanilla protein powder to the dough and reduce flour by a quarter cup for a healthier, high-protein treat
- Nutella-Stuffed Cookie Dough Cups: Create a center pocket and fill with a generous spoonful of Nutella before covering with more dough
- Gluten-Free Cookie Dough Cups: Use a gluten-free flour blend cup-for-cup in place of regular flour and ensure all other ingredients are certified gluten-free
- Cookie Dough Cheesecake Cups: Layer cookie dough with sweetened cream cheese filling for a decadent two-layer dessert
- Ice Cream Cookie Dough Cups: Bake the cups, let them cool completely, then fill with your favorite ice cream flavor and freeze until serving
- Brownie Cookie Dough Cups: Press cookie dough into the bottom of each cup and top with fudgy brownie batter before baking
Storage
- Store no-bake cookie dough cups in an airtight container in the refrigerator for up to one week to maintain freshness and texture
- Keep baked cookie dough cups at room temperature in a sealed container for three to four days if you prefer a softer texture
- Freeze cookie dough cups individually wrapped in plastic wrap and placed in a freezer bag for up to three months for long-term storage
- Thaw frozen versions in the refrigerator overnight or at room temperature for about 30 minutes before serving
- If filling with ice cream or whipped cream, assemble just before serving to prevent sogginess and maintain the best texture
- Layer parchment paper between stacked cookie dough cups in storage containers to prevent them from sticking together
The Secret Behind Perfect Cookie Dough Cups Every Time
The magic of incredible cookie dough cups lies in achieving the ideal dough consistency and flavor balance. Many home bakers struggle with dough that's either too dry and crumbly or too wet and sticky. The secret is in the butter-to-flour ratio and the type of sugar you use; brown sugar adds moisture and chewiness, while granulated sugar provides structure. Start with softened but not melted butter, and don't be afraid to adjust your flour by a tablespoon or two based on humidity and ingredient temperature. Professional bakers also know that a tiny pinch of salt enhances the sweetness and makes the chocolate flavors pop dramatically.
Another game-changing secret for cookie dough cups is the power of quality vanilla extract and the temperature of your ingredients. Real vanilla extract rather than imitation creates a depth of flavor that transforms ordinary dough into something extraordinary. Additionally, chilling your shaped cookie dough cups for at least 15 minutes before serving or baking helps them hold their shape perfectly and intensifies the flavors as they meld together. These small details make the difference between good and absolutely unforgettable treats that will have everyone asking for your recipe.
FAQ
How to make cookie cups with Pillsbury cookie dough?
Making cookie cups with Pillsbury cookie dough is incredibly simple. Preheat your oven to 350 degrees and spray a mini muffin tin with cooking spray. Slice the premade dough into rounds, then press each piece firmly into the muffin cups. Bake for 10 to 12 minutes until golden. Remove and immediately press centers with a spoon to create deeper cookie dough cups. Cool completely before filling with your favorite treats.
Is 325 or 350 better for cookies?
For cookie dough cups, 350 degrees is definitely the better temperature choice. This heat creates perfectly crispy edges while maintaining soft, chewy centers. Baking cookie dough cups at 350 allows them to set properly and develop golden-brown exteriors without overcooking. While 325 works for thin, delicate cookies, cookie dough cups need slightly higher heat to maintain their cup shape and hold fillings perfectly in 10 to 12 minutes.
What to fill cookie cups with?
Cookie dough cups can be filled with countless delicious options for different dessert experiences. Classic fillings include chocolate ganache, peanut butter mousse, vanilla pudding, sweetened cream cheese frosting, and whipped cream with berries. For indulgent cookie dough cups, try Nutella, caramel sauce, marshmallow fluff, or ice cream. Create layered fillings by combining cream cheese with crushed cookies or mascarpone with fruit preserves. Cookie dough cups are sturdy enough to hold creamy and chunky fillings beautifully.
How to make Snoop Dogg cookies?
Snoop Dogg's famous cookies are peanut butter sandwich cookies, not traditional cookie dough cups, but you can create an inspired version. Make peanut butter cookie dough cups by replacing half the butter with creamy peanut butter and adding extra brown sugar. Bake at 350 degrees for 11 minutes. Once cooled, fill with peanut butter frosting made from powdered sugar, butter, peanut butter, and vanilla. For authentic Snoop Dogg cookies, search for his official peanut butter sandwich cookie recipe online.
Time to Create Your Own Cookie Dough Cup Magic
Cookie dough cups have earned their place as one of the most beloved desserts you can make at home. These treats offer endless customization possibilities and impressive presentation for any occasion. Once you master the basic technique, you'll create new cookie dough cups variations constantly and spread joy with every batch you share.
Expand your dessert repertoire with our Fudgy Raspberry Brownies Recipe that combines rich chocolate with tart raspberry swirls, or try our Easy Cheesecake Gingerbread Cookies with warm spices and creamy filling. These recipes complement your cookie dough cups perfectly and give you more options for impressing everyone!
From my kitchen, with heart.
Nicole Harper ❤️
Related
Looking for other recipes like this? Try these:
Pairing
These are my favorite dishes to serve with Simple Cookie Dough Cups

Cookie Dough Cups
Equipment
- 1 Mini Muffin Tin or silicone mold
- 1 Electric mixer hand mixer works too
- 2 Mixing bowls large
- 1 set Measuring cups/spoons standard
- 1 Rubber spatula for folding
- 1 Cookie scoop or tablespoon
- 1 Cooling rack for baked version
- 1 Microwave-safe bowl for melting chocolate
- 1 Offset spatula for smoothing
- - Parchment or cupcake liners optional for easier removal
Ingredients
- 1 cup All-purpose flour heat-treated
- ½ cup Brown sugar packed
- ¼ cup Granulated sugar
- ½ cup Butter softened
- 1 teaspoon Vanilla extract
- ¼ teaspoon Salt
- ½ cup Chocolate chips or mix-ins
- 2 tablespoon Peanut butter optional filling
- 2 oz Cream cheese optional filling
- 2 tablespoon Powdered sugar for frosting or filling
- 1–2 tablespoon Milk or heavy cream as needed
Instructions
- Cream the butter and sugars together until light and fluffy.
- Add vanilla extract and salt, and mix well.
- Stir in the heat-treated flour until fully combined.
- Fold in chocolate chips or other mix-ins.
- Press dough evenly into the cups of a mini muffin tin.
- Fill the center with peanut butter, Nutella, or other fillings if desired.
- For no-bake version: Chill for 2 hours. For baked version: Bake at 350°F (175°C) for 12 minutes.
- Let cool completely before serving. Decorate as desired and enjoy!

Leave a Reply